Safety and liability. Mains (230 V) wiring can be fatal. This page provides general information: it is not a set of installation instructions, and it does not replace an electrician, the product’s own instructions or the applicable standards. Leave the wiring to an electrician; if you do it yourself, you do so at your own risk. To the extent permitted by law, BudaiLux accepts no liability for damage arising from the use of the information on this page. More on liability
Replacing a ceiling light or a chandelier looks simple at first: three wires, three terminals. In practice, this is where it is decided whether the light will work safely: whether the protective earth goes to the right place, whether the switch breaks the live, and whether the ceiling can carry the weight of the chandelier.
This article goes through the steps of connecting a light, shows in drawings how a one-way switch, a double switch and a two-way switch work, sums up how much a ceiling anchor can hold, and explains when the job is no longer one to carry on with alone.
How is a ceiling light connected?
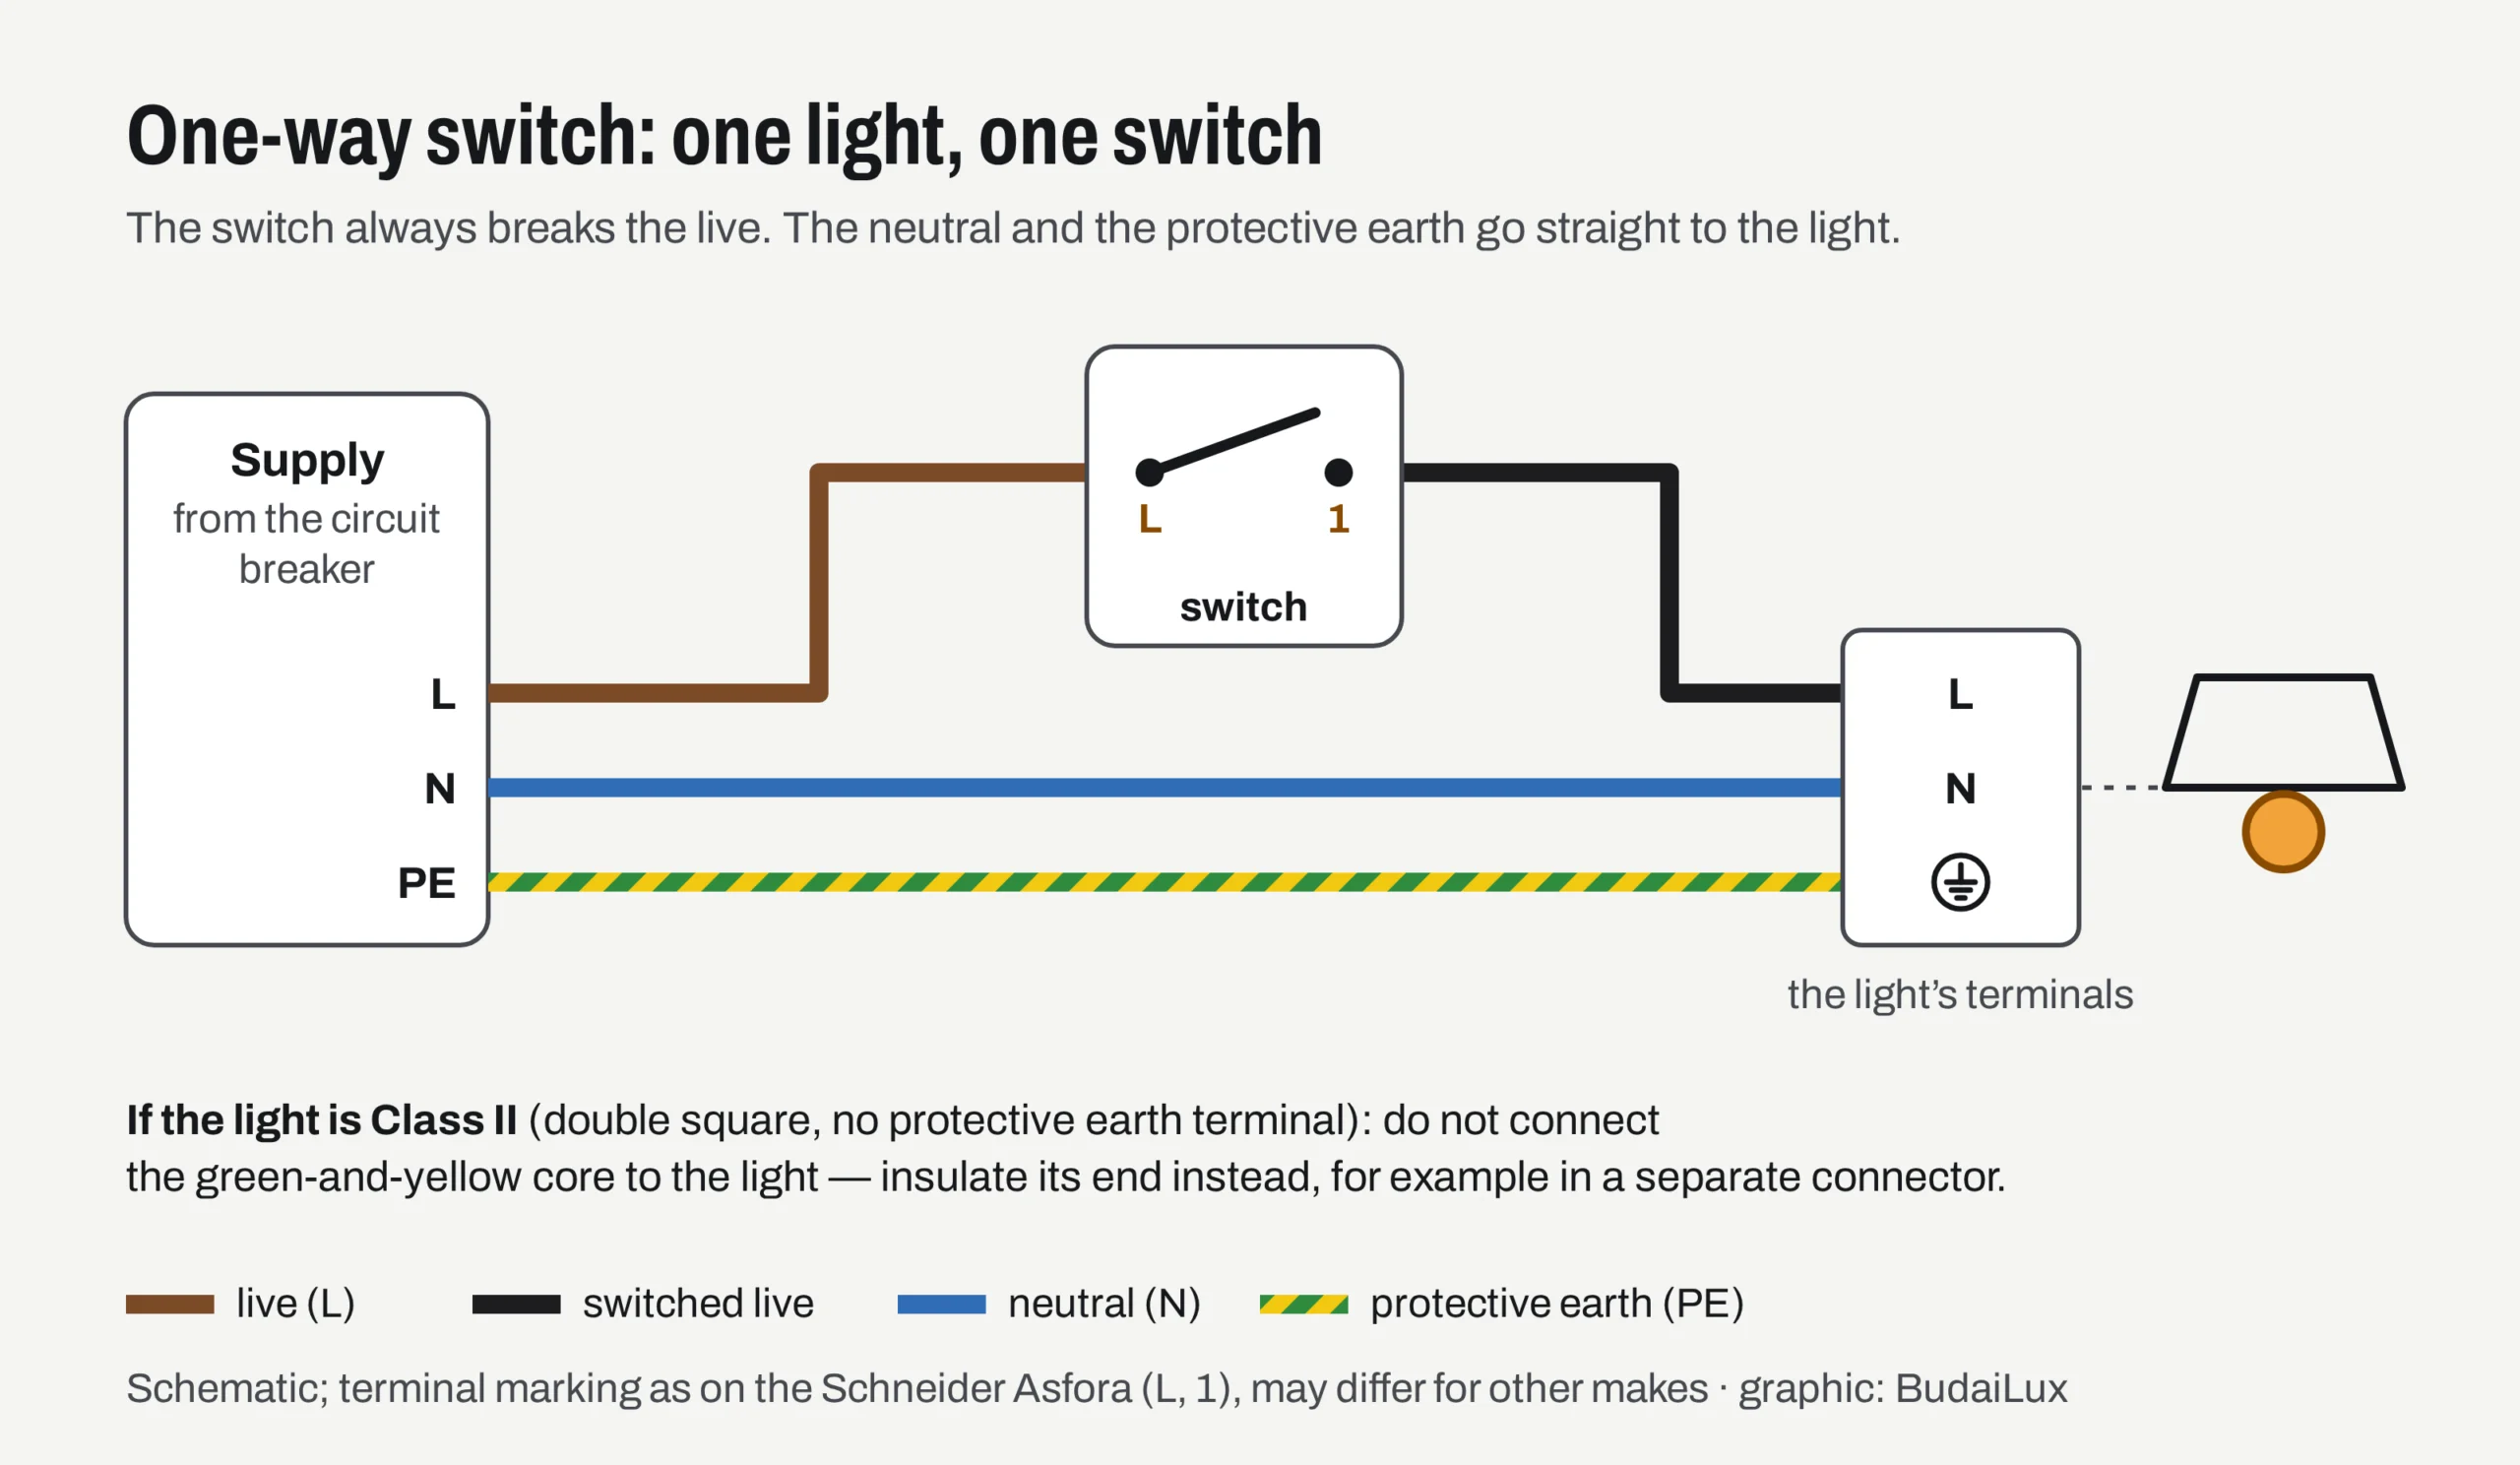
First the circuit breaker is switched off and a two-pole voltage tester is used to confirm that there is no voltage. Then the switched live goes to the light’s L terminal, the blue neutral to N and, on a Class I light, the green-and-yellow protective earth to the protective earth terminal. We recommend having mains wiring done by a qualified electrician — and if there is no protective earth, or anything is unclear, call one in any case.
Safety note. Light manufacturers’ instructions leave installation to professionals: Kanlux’s instructions state that only an authorised person may install the light, and that every step must be carried out with the power switched off. In some countries, national rules also restrict who may carry out electrical installation work. This article does not replace a qualified electrician or the light’s own instructions; it helps you understand what is happening and recognise when you need help.
What each colour means, and why the colours alone are not enough, is explained in our article on live, neutral and earth wire colours. The four steps for checking that there is no voltage are there too, with a drawing.
What are the steps in connecting a light?
The order matters: first the circuit is made dead, then the light is fixed in place, and only then is it connected. For a typical ceiling light there are ten steps. Read them as a checklist of what a proper job involves; if you are not qualified, leave the wiring to an electrician.
- Read the light’s instructions. Find the protection class, the wiring diagram for the terminal block, the cable cross-section and strip length, the maximum light source wattage and the fixing method.
- Switch off the circuit breaker and put a note on it so that nobody switches it back on. Switching off at the light switch is not enough.
- Check that there is no voltage with a two-pole voltage tester, between every pair of cores. A voltage-tester screwdriver is not suitable for this.
- Take down the old light and photograph the wiring before you disconnect anything. The old wiring may not have been right, but the photo shows how many cores there are and where each one went.
- Inspect the wire ends. Is the insulation intact, is the wire copper, is there a green-and-yellow protective earth? If the insulation is burnt or crumbling, or the wiring is aluminium, stop (see below).
- Fix the bracket or hook with an anchor suited to the ceiling material. Use the anchor supplied with the light only if the instructions say it is suitable for that ceiling; many lights come with no fixings at all.
- Connect the wires: the green-and-yellow protective earth to the protective earth terminal, the blue neutral to N, the switched live to L. Each core goes into its own terminal, stripped to the length the manufacturer specifies.
- Gently pull each core in turn to make sure the terminal holds it, and check that no bare copper sticks out of the terminal.
- Arrange the wires so that they are not trapped when the light is fixed and do not touch hot parts. Then fit the light source, within the stated maximum wattage.
- Switch the circuit breaker back on and test the light. If the circuit breaker or the RCD trips straight away, do not keep switching it back on: the fault has to be found.
The instructions for one of Kanlux’s pendant lights prescribe the last step like this: before first use, check that the mechanical fixing and the electrical connection are correct. The same instructions also point out that the ceiling anchor and screw are not included in the kit.
What should you watch out for at the connector?
The connector (terminal block) is where the cores from the wall and the cores from the light are joined. Two kinds are common: the screw type, in which a screw clamps the wire, and the spring type (lever or push-in connectors, often just called “Wagos”), in which a spring or a lever holds the core.
| Connector | Wire | Strip length | Rating | For aluminium |
|---|---|---|---|---|
| WAGO 221 lever connector | solid and stranded 0.2–4 mm², fine-stranded 0.14–4 mm², copper only | 11 mm | 450 V, 32 A | no |
| WAGO 2273 push-in connector | solid 0.5–2.5 mm² | 11 mm | 450 V, 24 A | only with Alu-Plus contact paste |
- One core per terminal. Do not twist two cores together into a screw terminal, and do not fold the wire back on itself to make it “thicker”.
- Strip length matters. Too short, and the terminal grips the insulation; too long, and bare copper sticks out of it.
- Not every connector is suitable for aluminium wire. According to WAGO, the 221 series is not approved for aluminium, and the 2273 series only for solid aluminium of up to 4 mm², with Alu-Plus contact paste. In an older home with aluminium wiring, connecting a light is therefore a job for an electrician.
What is the difference between a one-way switch, a double switch and a two-way switch?
All three break the live; the difference is how many lighting circuits they switch, and from how many places. Manufacturers’ catalogues also give them numbers: in Schneider’s Hungarian catalogue, for example, the single-pole one-way switch is 101, the double switch 105 and the two-way switch 106.
| Switch | What is it for? | Terminals (Schneider Asfora) | Switched live to the light |
|---|---|---|---|
| One-way (101) | one light, from one place | L, 1 | 1 core |
| Double switch (105) | two lighting circuits from one place, with two rockers | L, 1, 2 | 2 cores |
| Two-way switch (106) | one light from two places (e.g. both ends of a corridor) | L, 1, 2 — you need two of them | 1 core, plus 2 strappers between the switches |
| Intermediate switch (107) | from three or more places, between two two-way switches | as shown in the manufacturer’s diagram | 1 core |
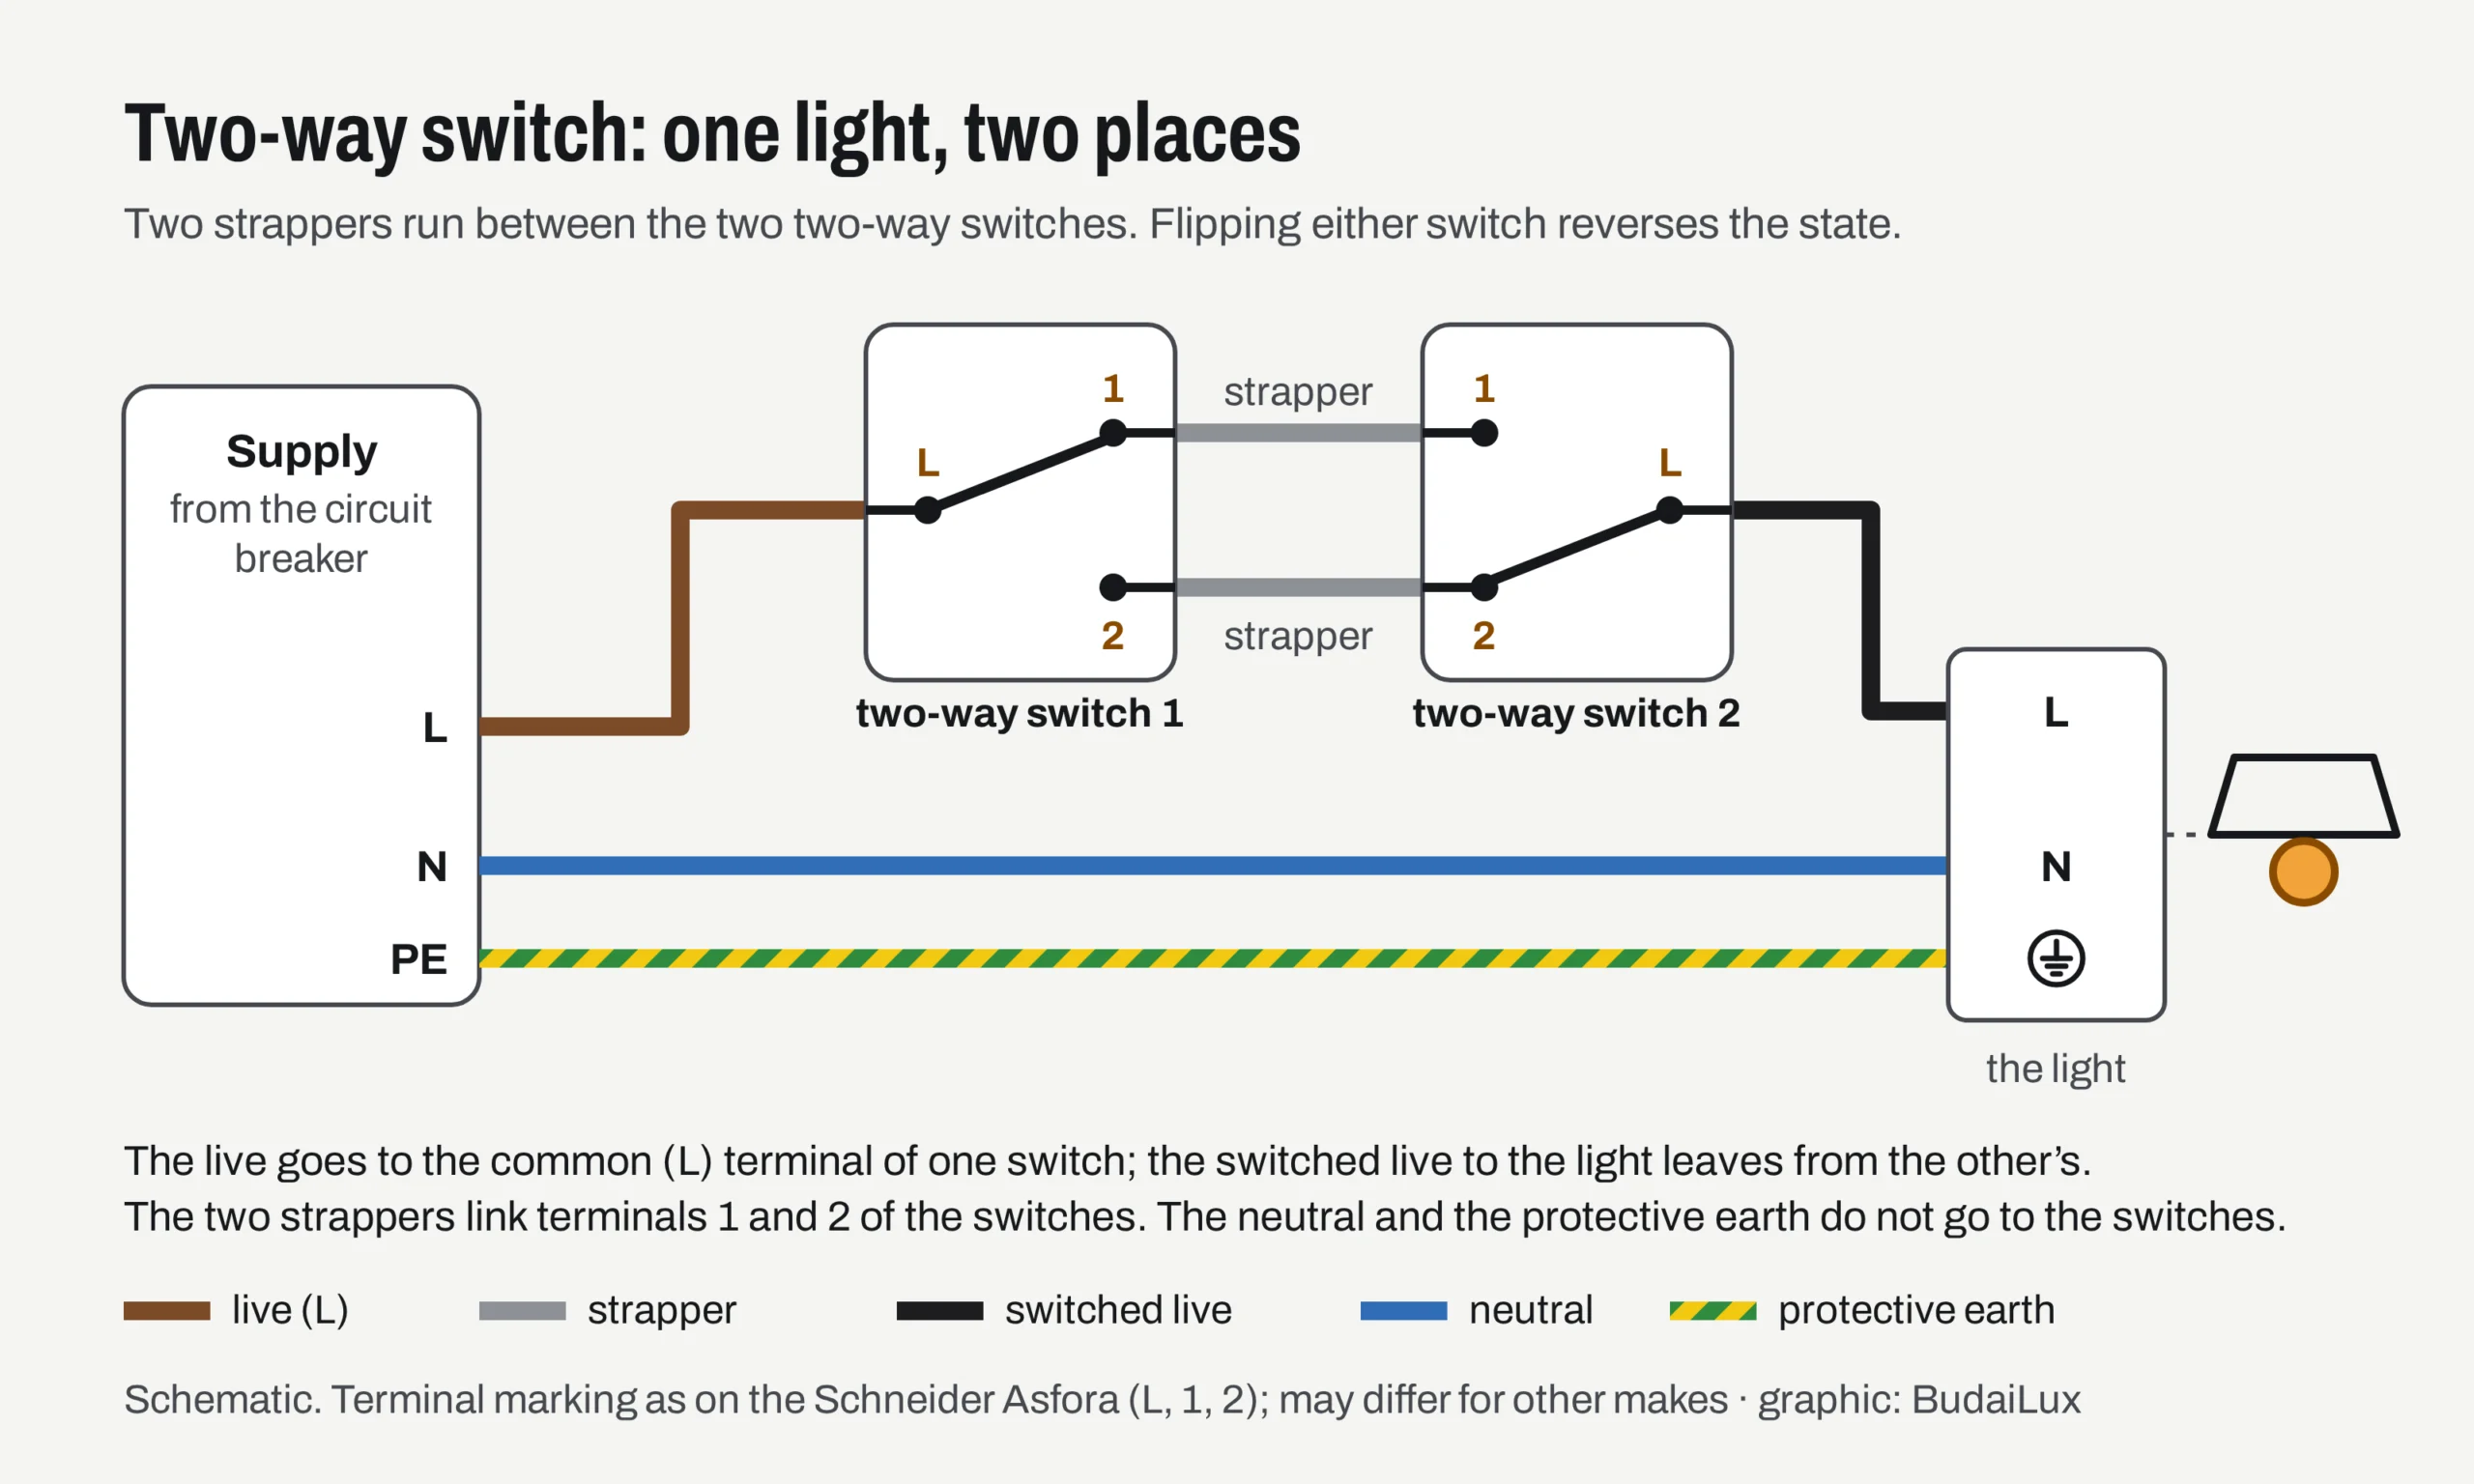
Two-way switches let you switch one light from two places. The live arrives at the common (L) terminal of one switch, the switched live to the light leaves from the common terminal of the other switch, and terminals 1 and 2 of the two switches are joined by two strapping wires (strappers). Flipping either switch reverses the state of the light.
How is a double switch wired?
A double switch is two switches in one box with a common input: the live arrives at its L terminal, and a switched live leaves each of terminals 1 and 2 for the chandelier’s two groups of bulbs. The neutral and the protective earth are shared, and do not go to the switch.
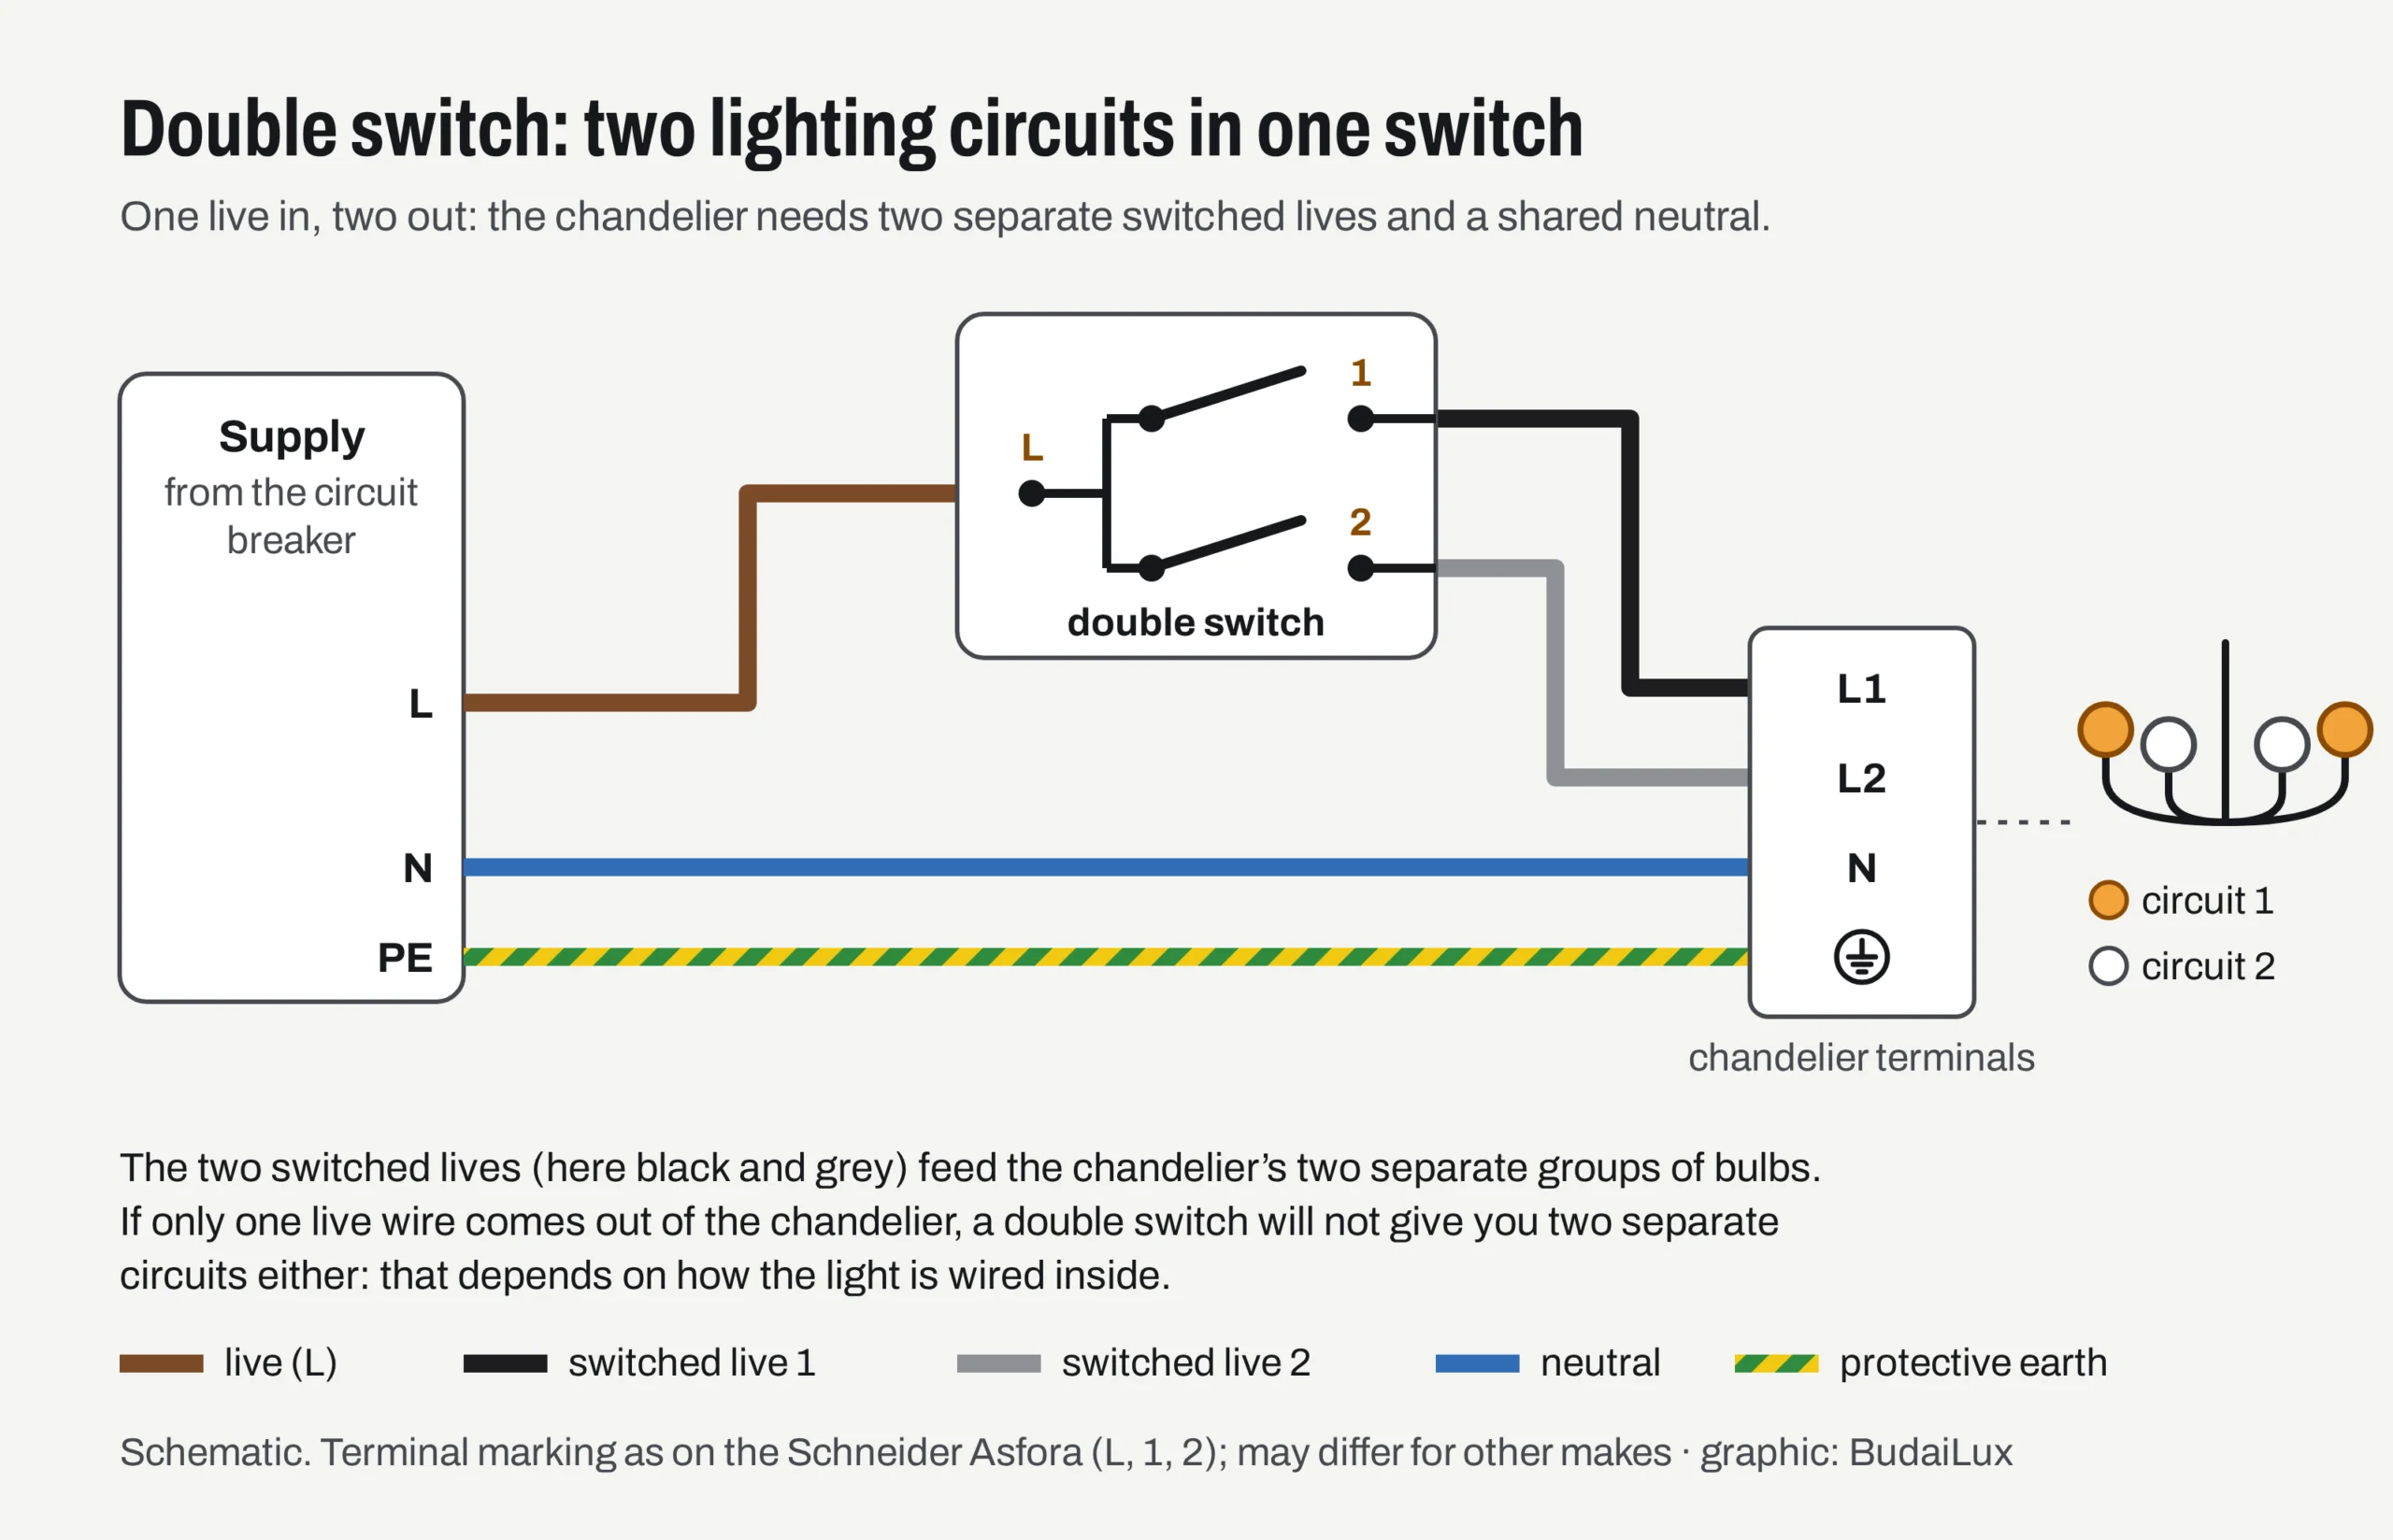
Two conditions have to be met to wire a double switch. One concerns the wiring: the ceiling outlet must have two switched live cores as well as the neutral and the protective earth, which means two separate cores run from the switch to the light. The other concerns the light: the chandelier must also have two separate live wires coming out of it, each for its own group of bulbs.
If only one switched live comes out of the ceiling, a double switch will not switch two circuits: that needs a new cable pulled in, which is work for an electrician. If the chandelier has only one live wire, the two circuits would have to be separated inside the light, which means modifying the light — do not do this yourself, because the manufacturer’s declaration of conformity does not cover a modified light.
How much can the ceiling hold, and how should a heavy chandelier be fixed?
A chandelier is never held by its cable, but by the hook or the mounting plate — and that holds only as much as the anchor can in that particular ceiling. The anchor manufacturer gives this figure for each ceiling material. Look for the chandelier’s weight on the data sheet or the packaging; if it is not stated, weigh it in its box and subtract the weight of the box.
| Fixing | Ceiling | Recommended load | Roughly |
|---|---|---|---|
| fischer DuoTec 12, with hook screw | plasterboard, 12.5 mm | 0.20 kN | 20 kg |
| fischer DuoTec 12, with hook screw | plasterboard, 2 × 12.5 mm | 0.43 kN | 44 kg |
| fischer DuoTec 12, with hook screw | concrete (≥ C20/25) | 0.30 kN | 30 kg |
| fischer DuoTec 12, with hook screw | prestressed hollow-core slab | 0.50 kN | 50 kg |
| fischer KDH spring toggle with hook (depending on size) | plasterboard, 12.5 mm | 0.07–0.18 kN | 7–18 kg |
Two conclusions follow from the table. First, a single anchor in plasterboard may not be enough for a heavy crystal chandelier: it has to be fixed to the structure behind the plasterboard (timber, a metal profile, the floor slab above). Second, the load capacity depends on the type of anchor, its size and the ceiling material all at once: each row of the table applies only to that product, screw diameter and base material.
An anchor behaves differently in a hollow slab than in solid concrete; fischer’s table, for example, lists prestressed hollow-core slabs in a separate row. If you do not know what is behind the plaster, or the chandelier weighs more than a few kilograms, leave the fixing to a professional. To work out what size of chandelier suits the room, see the chandelier size calculator and our article on choosing a chandelier for the living room.
What should the light’s instructions contain?
A light must come with instructions and safety information in a language that consumers can easily understand, as determined by each member state: the EU Low Voltage Directive (2014/35/EU) requires this of the manufacturer in Article 6(7). In Hungary, section 5(8) of Decree 23/2016 (VII. 7.) NGM requires the manufacturer to supply instructions for use in Hungarian, which must be clear and easy to understand, and the importer must make sure that the Hungarian instructions come with the product.
Under Annex I to the Directive, the essential characteristics needed for safe use must be marked on the product or, if that is not possible, in the accompanying documentation. For a light, in practice you will find these in the instructions:
- the protection class and, for Class I, the warning that the protective earth must be connected;
- the wiring diagram of the terminal block (L, N, protective earth), the cross-section of the wire to be connected and the strip length;
- the base of the light source and the maximum wattage;
- the fixing method, and whether the fixings come with the light;
- what kind of surface it can be mounted on (for example, normally flammable surfaces), and whether it is for indoor or outdoor use;
- warnings about installation: by a qualified person, with the power switched off.
If a light comes without instructions in your language, that in itself is a warning sign. What else has to appear on a light and its box is covered in our article on CE marking.
When should you call an electrician?
Switch and light manufacturers’ instructions agree in leaving installation to professionals: according to Legrand, the product may only be installed by a qualified electrician, and according to Schneider, safe electrical installation may only be carried out by trained professionals. In these cases, do not carry on alone under any circumstances:
- the light is Class I (metal, with a protective earth terminal), but there is no protective earth in the ceiling;
- the wiring is aluminium, or copper and aluminium meet;
- the insulation is burnt, browned or crumbling, or you can see signs of melting in the junction box;
- you still measure voltage after switching off, or the switch breaks the blue core;
- a new circuit, a new switch or a new cable is needed (for example the second switched live for a double switch);
- a heavy chandelier has to be fixed, and you do not know what is in the ceiling;
- the circuit breaker or the RCD trips after the light has been connected.
If the light is going outdoors, with a motion sensor or a dusk-to-dawn sensor, the wiring is one step more complicated: that is covered in our article on wiring a motion sensor and a dusk-to-dawn sensor. For the IP rating an outdoor light needs, our guide to IP ratings gives the numbers.
Frequently asked questions
How many wires does a double switch need?
One live goes into the switch, and two switched lives come out of it. So the ceiling needs two switched live cores, plus the neutral and — for a Class I chandelier — the protective earth. If only one switched live comes out of the ceiling, a double switch will not give you two separate circuits either.
Can a two-circuit chandelier be connected to a one-way switch?
Yes, if the chandelier’s instructions allow it: the chandelier’s two live wires are then joined in a connector and connected to the common switched live, so all the bulbs switch together. If you are unsure, ask the manufacturer or an electrician.
What if there is no green-and-yellow wire in the ceiling?
A Class I metal light must not be installed like that, because in the event of a fault its metal housing could become live. Either choose a Class II light (double square symbol), or call an electrician to install a protective earth.
Which connector is better: screw or spring?
Both are fine if they suit the wire and are used according to the manufacturer’s data. With spring (lever) connectors, the strip length and the cross-section are critical; with screw terminals, the tightening. Neither is automatically suitable for aluminium: that needs a connector specifically approved for it.
Is switching off the light switch enough to change a light?
No. The switch breaks only the live (and with faulty wiring, not even that), so there may still be voltage in the junction box and at the light’s terminal block. Switch off the circuit breaker, and check with a two-pole voltage tester that there is no voltage.
Sources
- Schneider Electric: Wiring devices catalogue 2026 (in Hungarian, PDF; Asfora range table) and Asfora Catalog 2026 (English, PDF; wiring examples: 1-way, 2-circuit, 2-way)
- WAGO: product data for the 221-413 splicing connector with levers and the 2273-203 PUSH WIRE splicing connector; Practical tip: connecting aluminum and copper conductors
- fischer: DuoTec load table and KDH spring toggle load table (English, PDF)
- Directive 2014/35/EU on electrical equipment designed for use within certain voltage limits (Low Voltage Directive), EUR-Lex; in Hungary: Decree 23/2016 (VII. 7.) NGM on the placing on the market, safety requirements and conformity assessment of electrical equipment designed for use within certain voltage limits, National Legislation Database (in Hungarian)
- Kanlux: ETISSA / OGIVA pendant installation instructions (multilingual, PDF); Legrand: instructions for the Niloé Step double switch (in Hungarian, PDF); Schneider Electric: Asfora rotary dimmer instructions (multilingual, PDF)