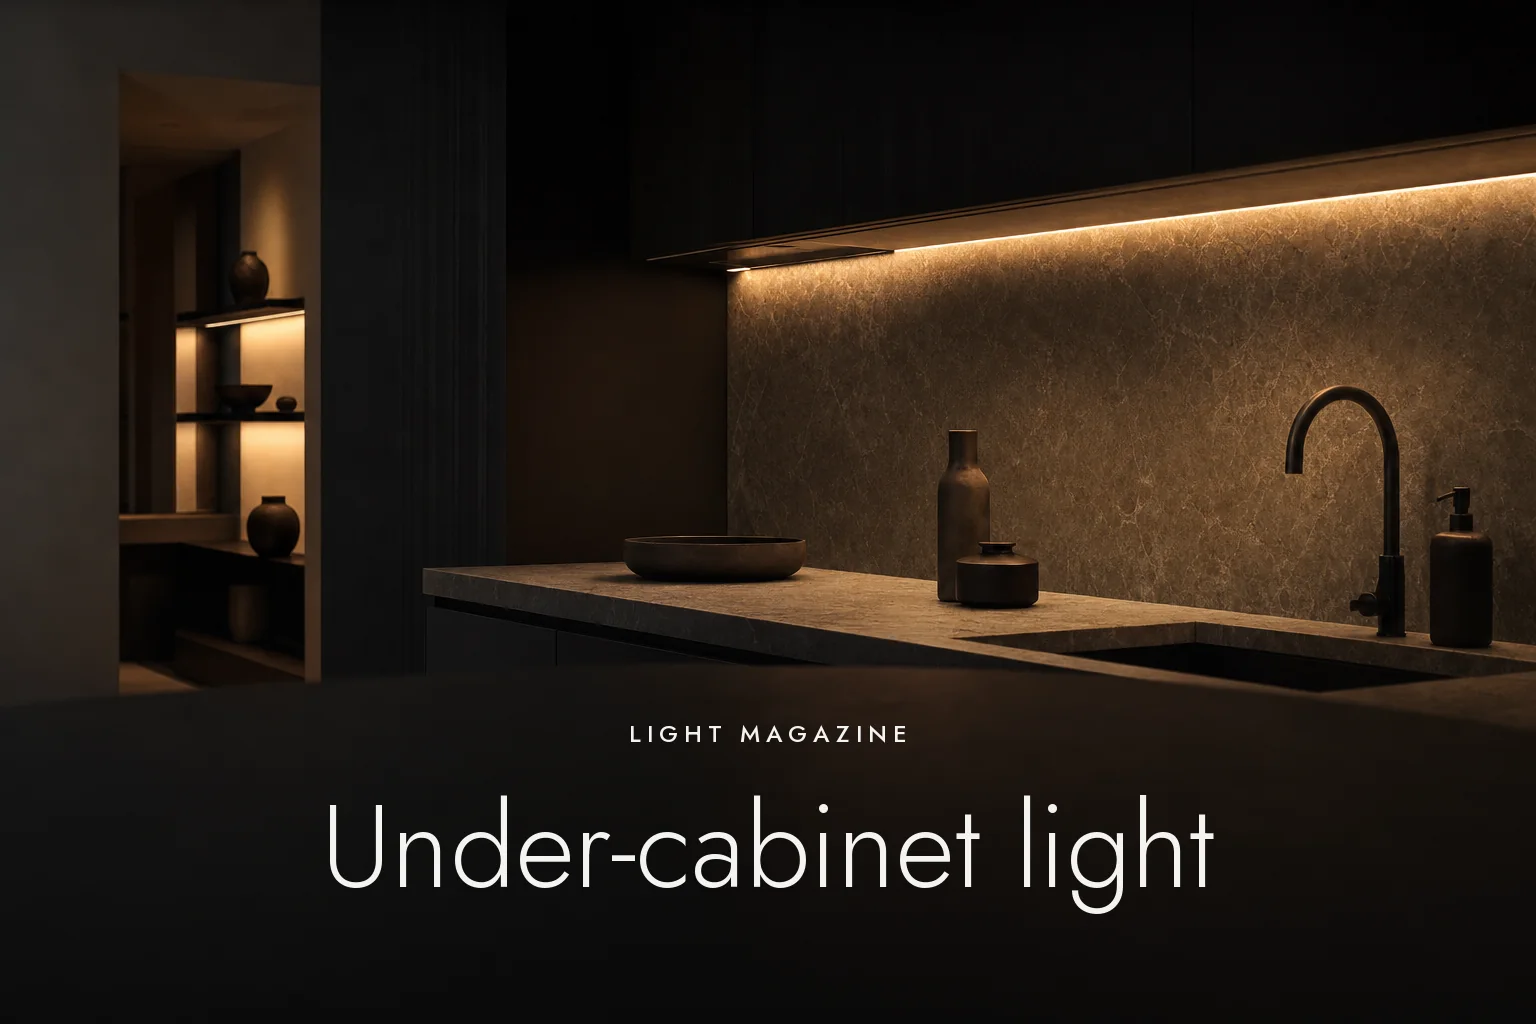
In a kitchen, most of the work happens on the worktop, yet that is often where the light is worst: the ceiling light is behind you, and your own shadow falls on the worktop. The simplest way to light a kitchen worktop is an LED strip fitted under the wall cabinets: it solves the problem cheaply and almost invisibly — provided the strip, the power supply and the profile are a good match.
Below we go through how much light the worktop needs, what to check on the strip’s datasheet, whether to choose 12 or 24 V, what size of power supply you need, and what to watch out for next to the sink.
Why does a kitchen worktop need its own lighting?
Because while you work, the ceiling light is behind you, so the shadow of your own head and shoulders falls on the worktop. An LED strip fitted under the wall cabinet lights it from the front and from close up. Our lumen calculator uses 300 lux for the general lighting of a kitchen, and a separate 500 lux for the worktop.
This is the essence of layered lighting: the general light lights the room, the task light lights the work surface, and the two can be switched separately. The layers and the amount of light for each room are covered in our article How many lumens do I need?
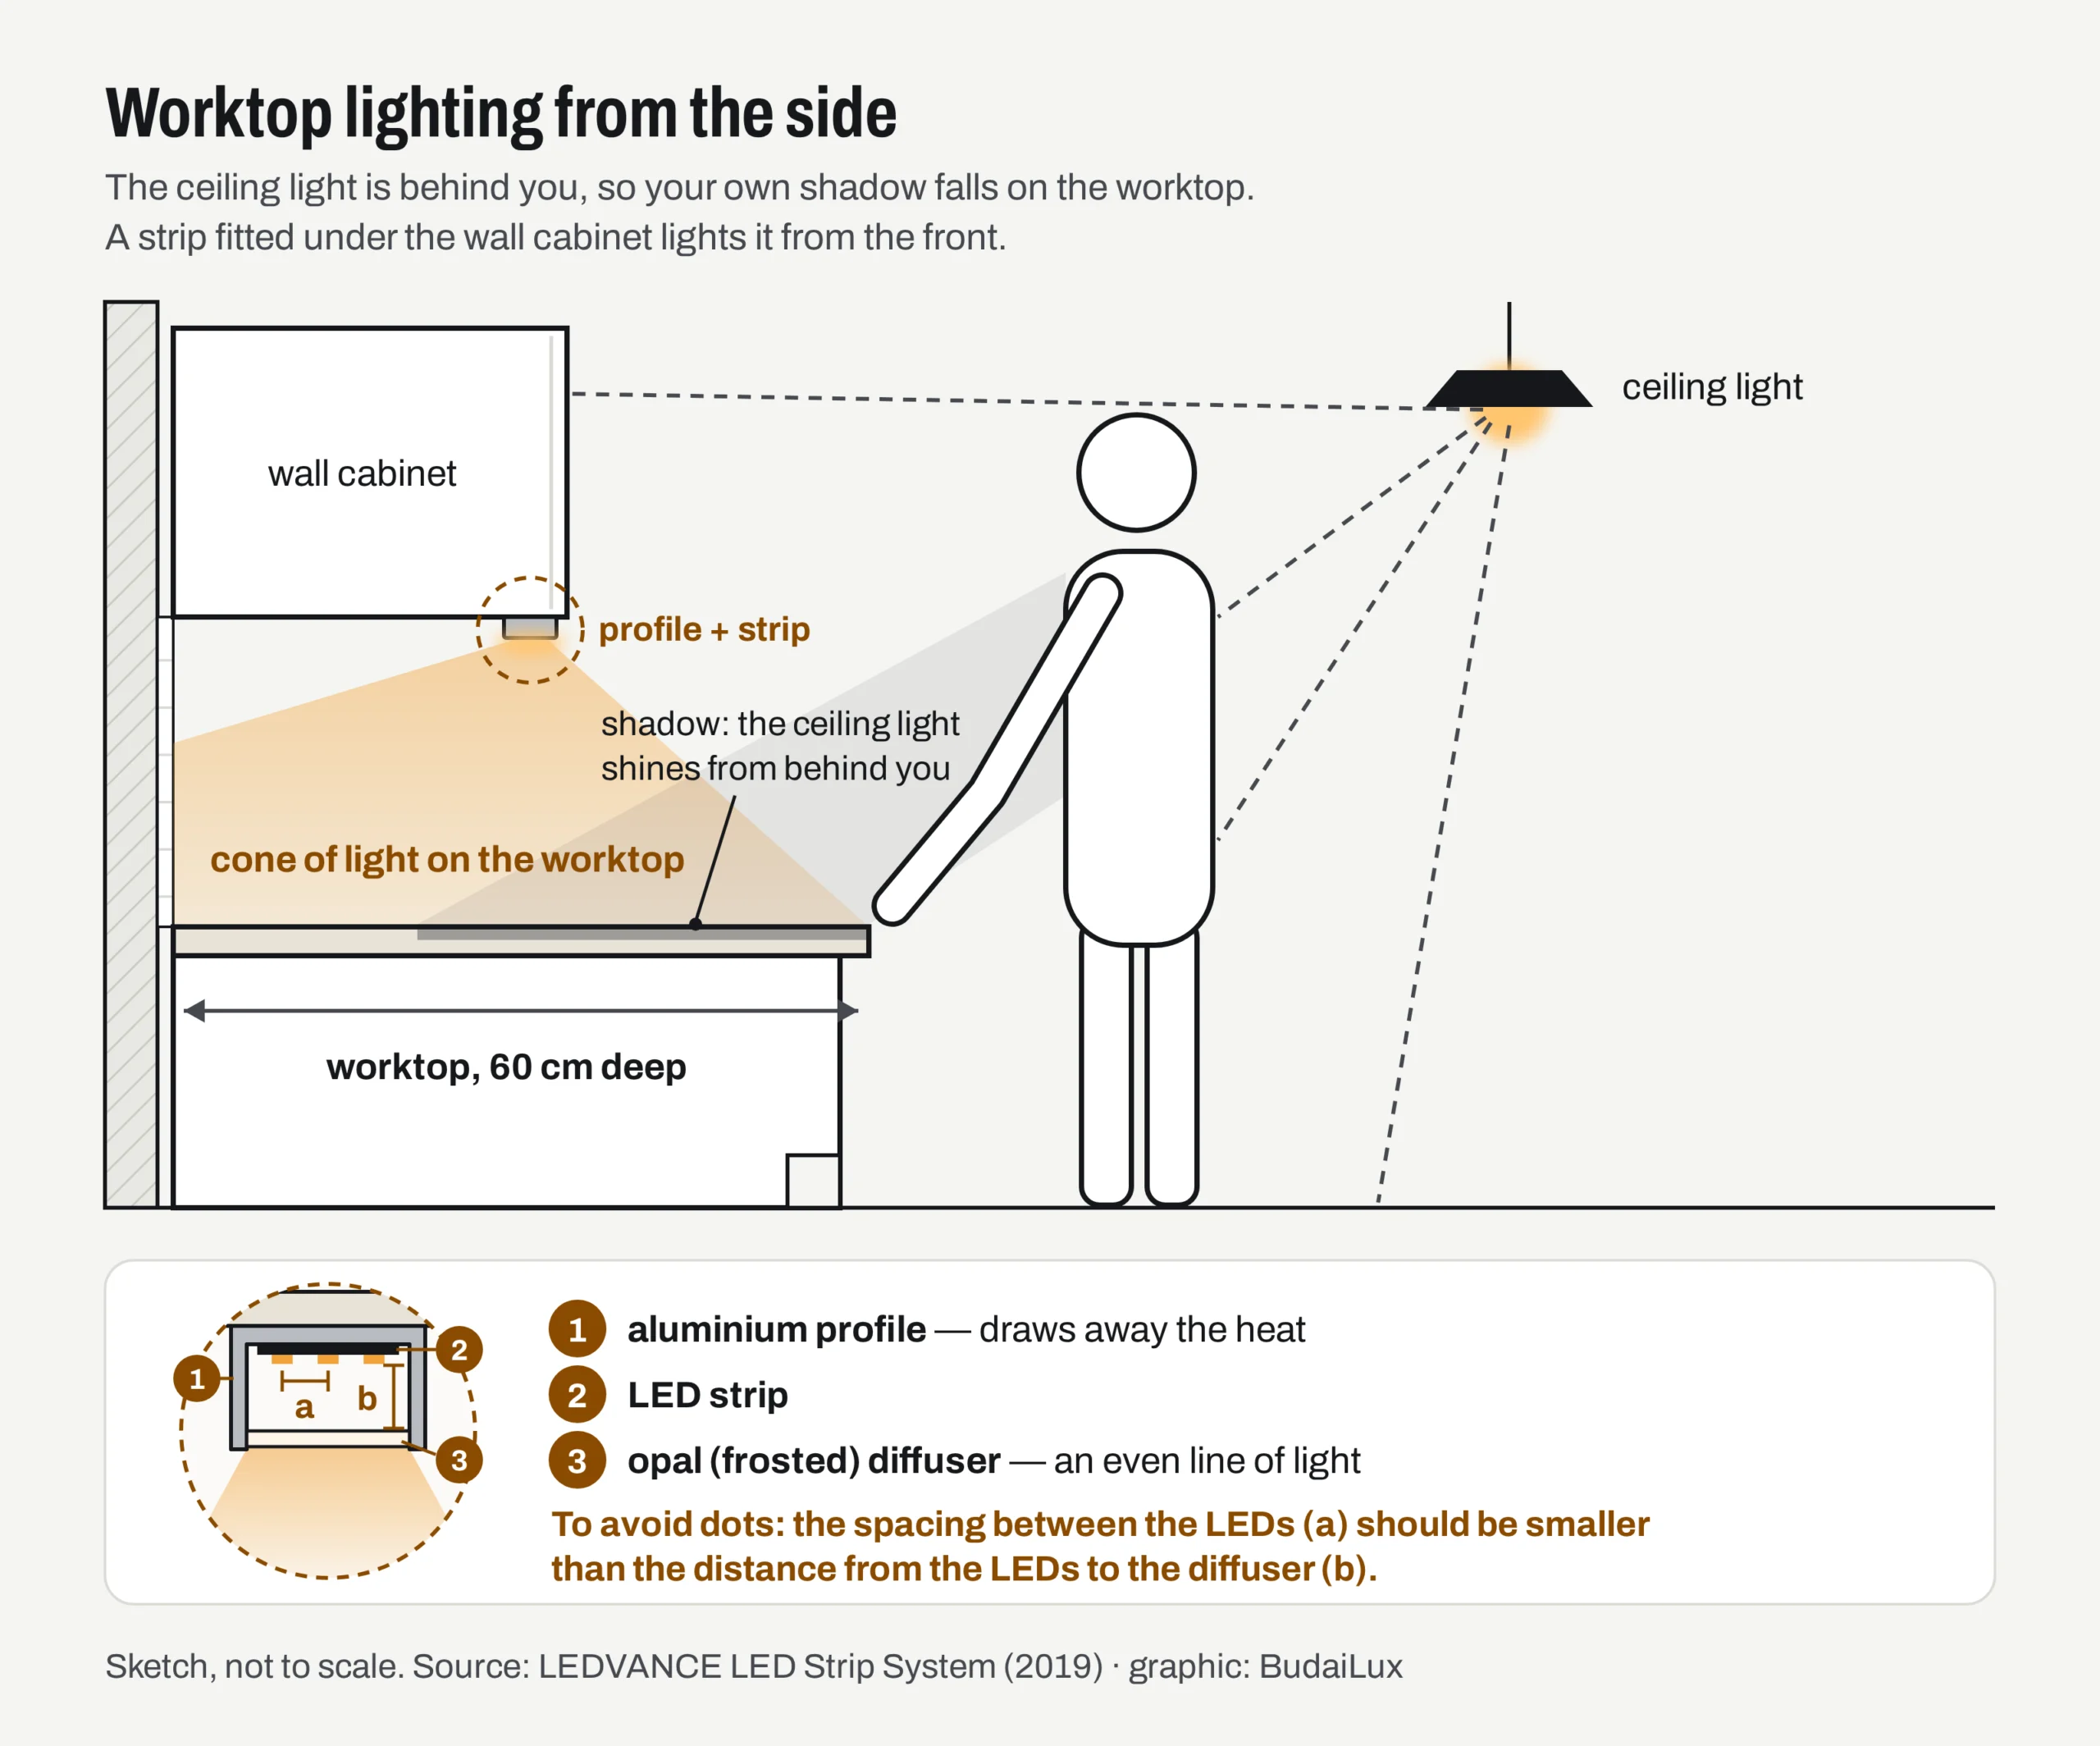
Fit the strip to the underside of the wall cabinet, close to its front edge. That way the front of the worktop gets light too, and the edge of the cabinet hides the line of light from your eyes. A strip pushed back against the wall mainly lights the tiles, and on glossy tiles the line of light can be reflected.
How many lumens does a kitchen worktop need?
As a design estimate: a strip with a nominal luminous flux of roughly 600–900 lumens per metre. The calculation: 500 lux on a 60 cm deep worktop is needed over 0.6 m² per metre, which is 500 × 0.6 = 300 lumens on the worktop surface. Only part of the strip’s light reaches the worktop — the diffuser absorbs some of it, and some falls on the wall and the cabinet — so it is worth allowing two to three times that.
This is an estimate, not a measurement: the actual value also depends on the mounting height, the profile and the colour of the tiles. It is better to choose from the upper part of the range and turn it down with a dimmer. The lumen calculator works out the overall light requirement of the kitchen from the size of your room; the difference between lumens and lux is explained in our article on lumens, lux, watts and kelvin.
What should you check on the LED strip’s datasheet?
Strip specifications are given per metre. If you are choosing an LED strip for the kitchen, these are the ones that matter:
| Specification | What does it mean? | For a kitchen worktop |
|---|---|---|
| Power (W/m) | Consumption per metre; you size the power supply from it | needed for the power supply |
| Luminous flux (lm/m) | The amount of light per metre | about 600–900 lm/m |
| Number of LEDs (LEDs/m) | A denser strip gives a more even line of light | 60 LEDs/m or more, in a profile |
| Colour rendering (Ra, CRI) | How true the colours of food look | Ra 90 or more |
| Colour temperature (K) | The colour of the light | 3000–4000 K; 3000 K if it shares a space with the living room |
| Colour consistency (SDCM) | How uniform the light colour of different units is | 3 or less, if several sections are visible side by side |
| Voltage (V) | 12 V or 24 V direct current | 24 V |
| IP rating | Protection against water and dust | IP20 in dry areas, IP44 or more next to the sink |
| Tc point, ambient temperature | The strip’s heat tolerance | don’t exceed it, even in a profile |
Light colour is covered in detail in our article on colour temperature. An LED strip is a light source, so its box also carries the energy label and the luminous flux. One difference from mains bulbs: the EU flicker limits apply to light sources running directly on 230 V, not to a 24 V strip — here, freedom from flicker depends on the power supply and the dimmer.
Should the LED strip be 12 V or 24 V?
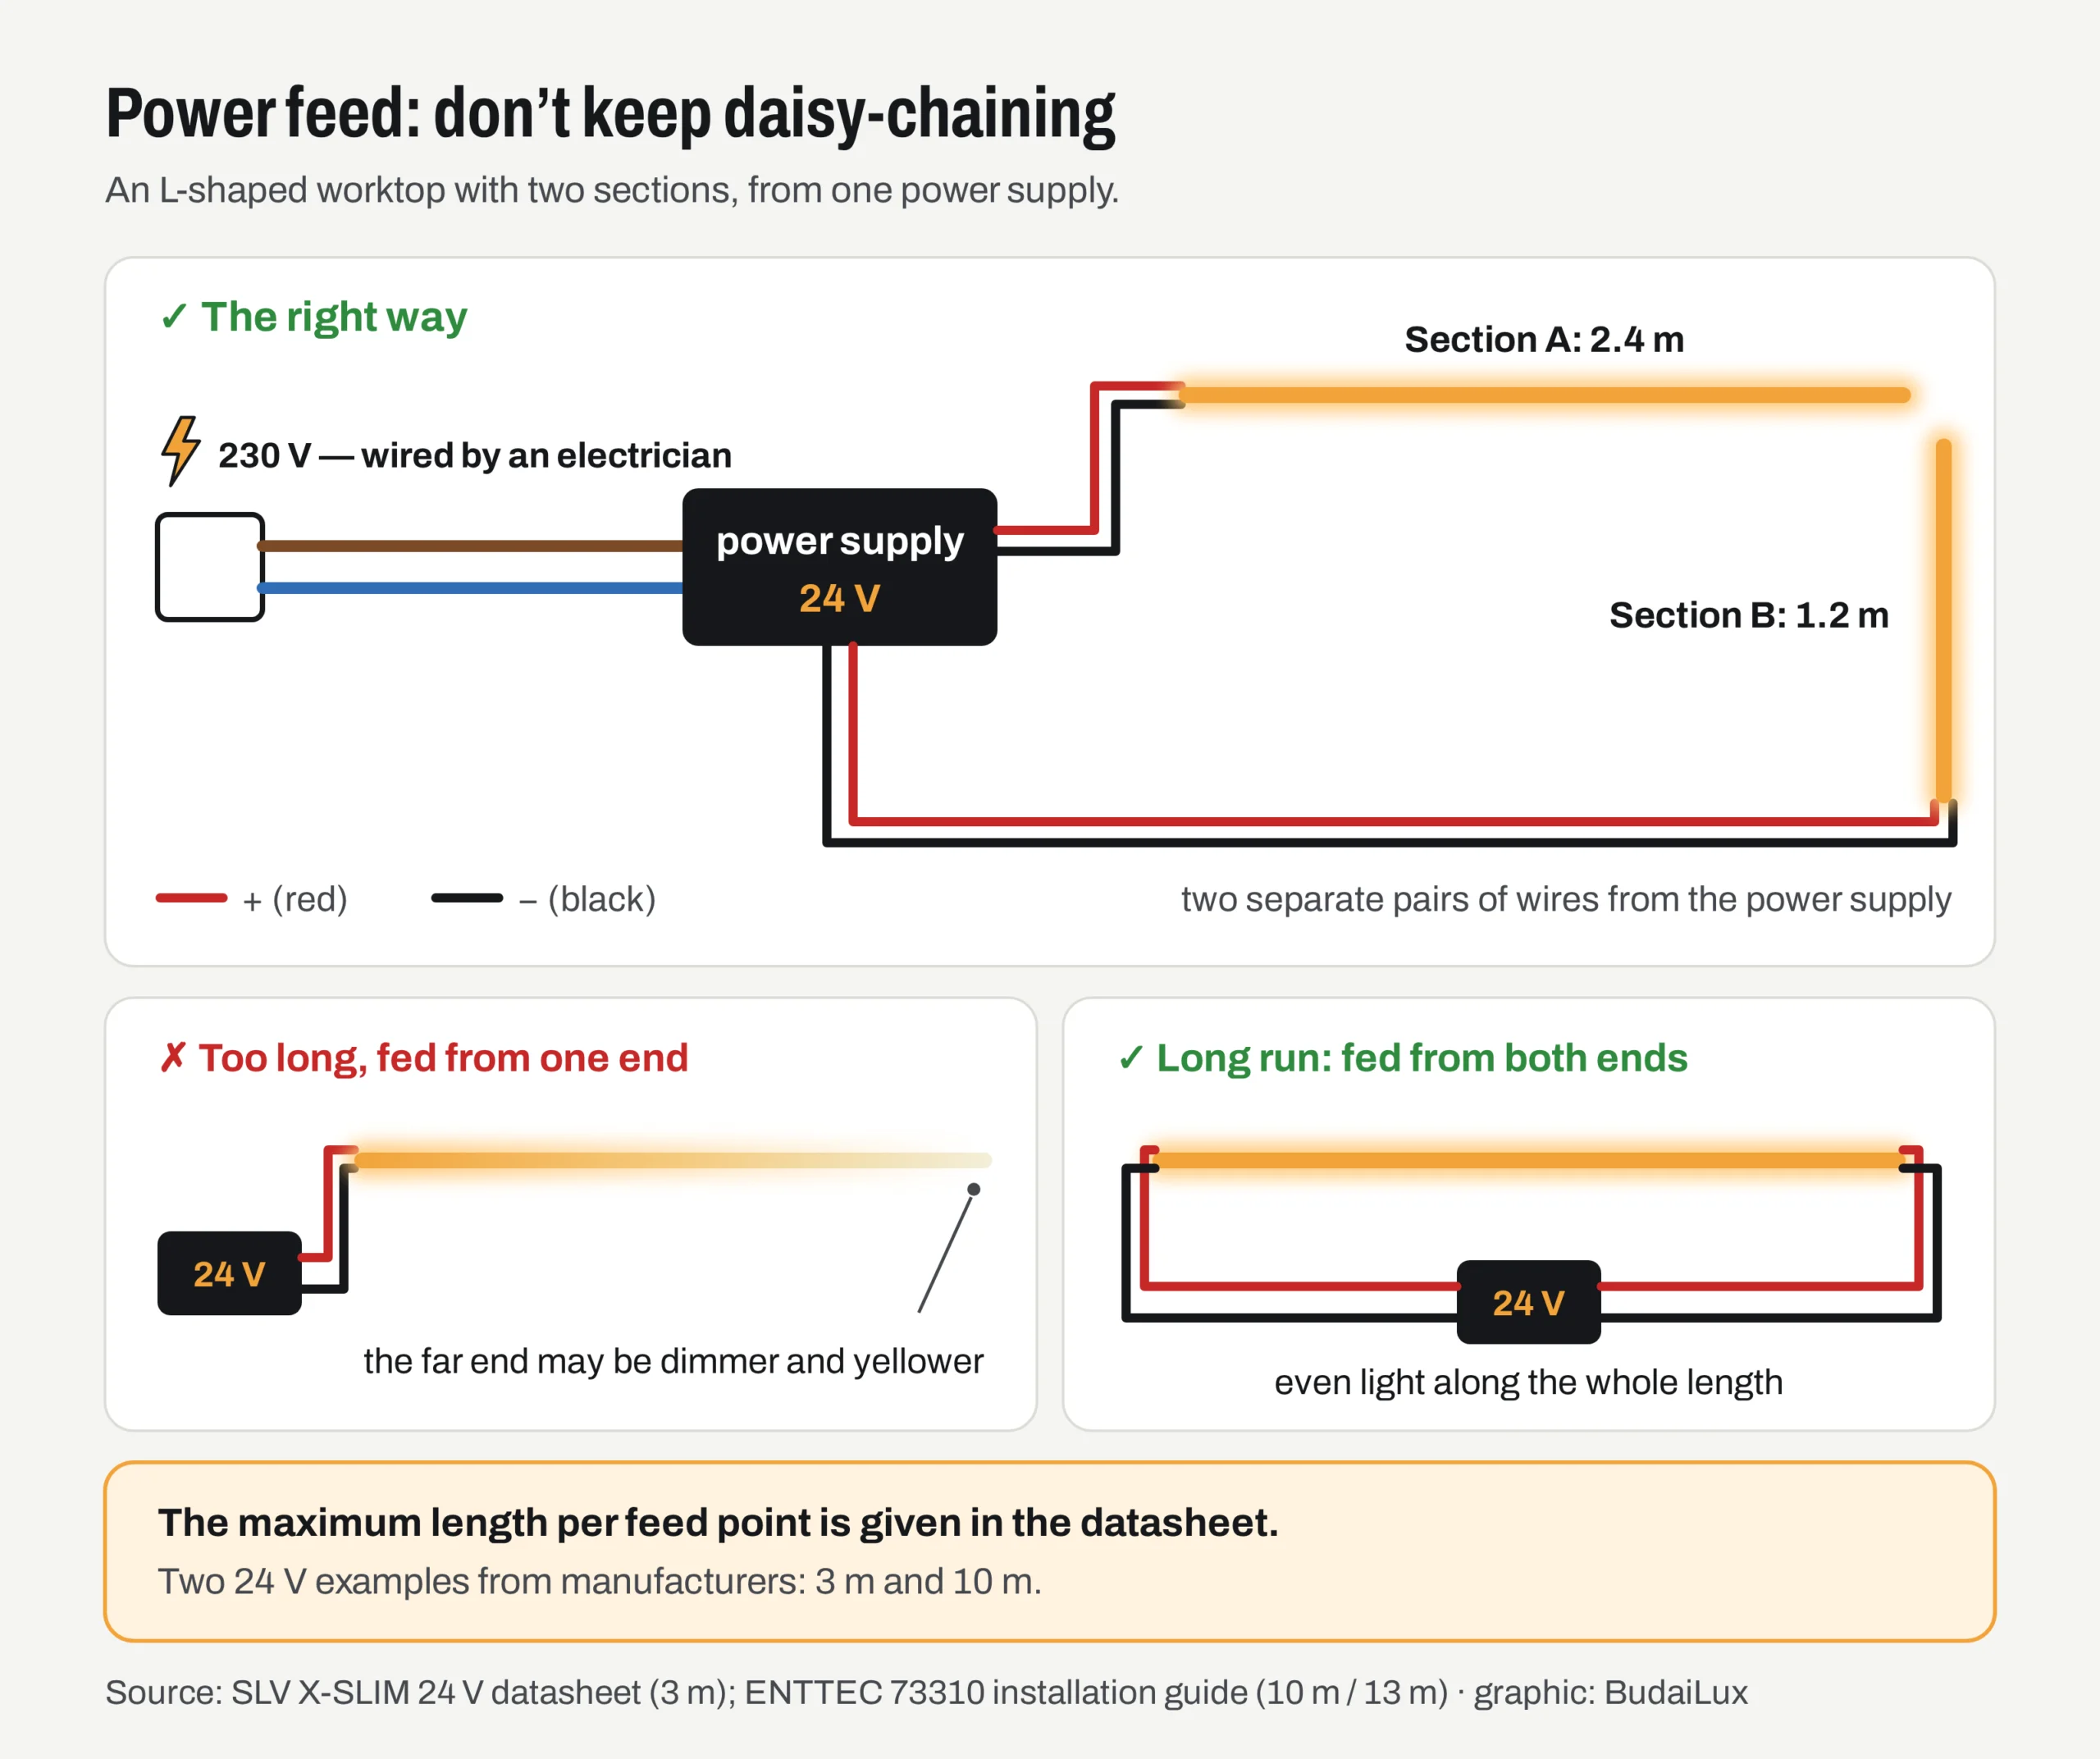
For a kitchen worktop, 24 V is usually better. The same power needs half the current (current = power ÷ voltage), so there is less voltage drop along the strip’s thin copper conductors: the end of the strip doesn’t fade, and a longer section can be fed from one point.
An example from the datasheet for Mean Well’s NPF-60 power supply series: the rated current of the 60 W, 12 V version is 5 A, and of the 24 V version 2.5 A. Voltage drop is proportional to current, so on the same conductor at 24 V it is halved in volts, and quartered relative to the supply voltage.
How long a strip can be run from one feed point is given in the strip’s datasheet, and it varies a great deal between products. A few manufacturers’ examples: for one strip family from Super Bright LEDs, 5 m at 12 V and 7 m at 24 V; for one narrow 24 V strip from SLV, a new feed point is needed after 3 m; for one 24 V, 120 LEDs/m strip from ENTTEC, 10 m from one end and 13 m from both ends.
When connecting the LED strip, if the worktop is longer or L-shaped, don’t daisy-chain the sections: connect each one to the power supply with its own pair of wires, and feed a long section from both ends.
What size of power supply does an LED strip need?
Multiply the strip’s wattage per metre by its length, and add at least 30% headroom: power supply ≥ W/m × metres × 1.3. The 30% is the recommendation of the power supply manufacturer Mean Well: for reliability, it suggests a power supply at least 30% larger than the actual requirement, for example a 130 W one for a 100 W system.
| Strip | Power | With headroom (× 1.3) | Power supply to choose |
|---|---|---|---|
| 1.8 m × 6 W/m | 10.8 W | 14.0 W | 20 W |
| 2.4 m × 10 W/m | 24 W | 31.2 W | 40 W |
| 3.6 m × 10 W/m | 36 W | 46.8 W | 60 W |
| 3.6 m × 15 W/m | 54 W | 70.2 W | 75 W or larger |
| 5.0 m × 15 W/m | 75 W | 97.5 W | 100 W |
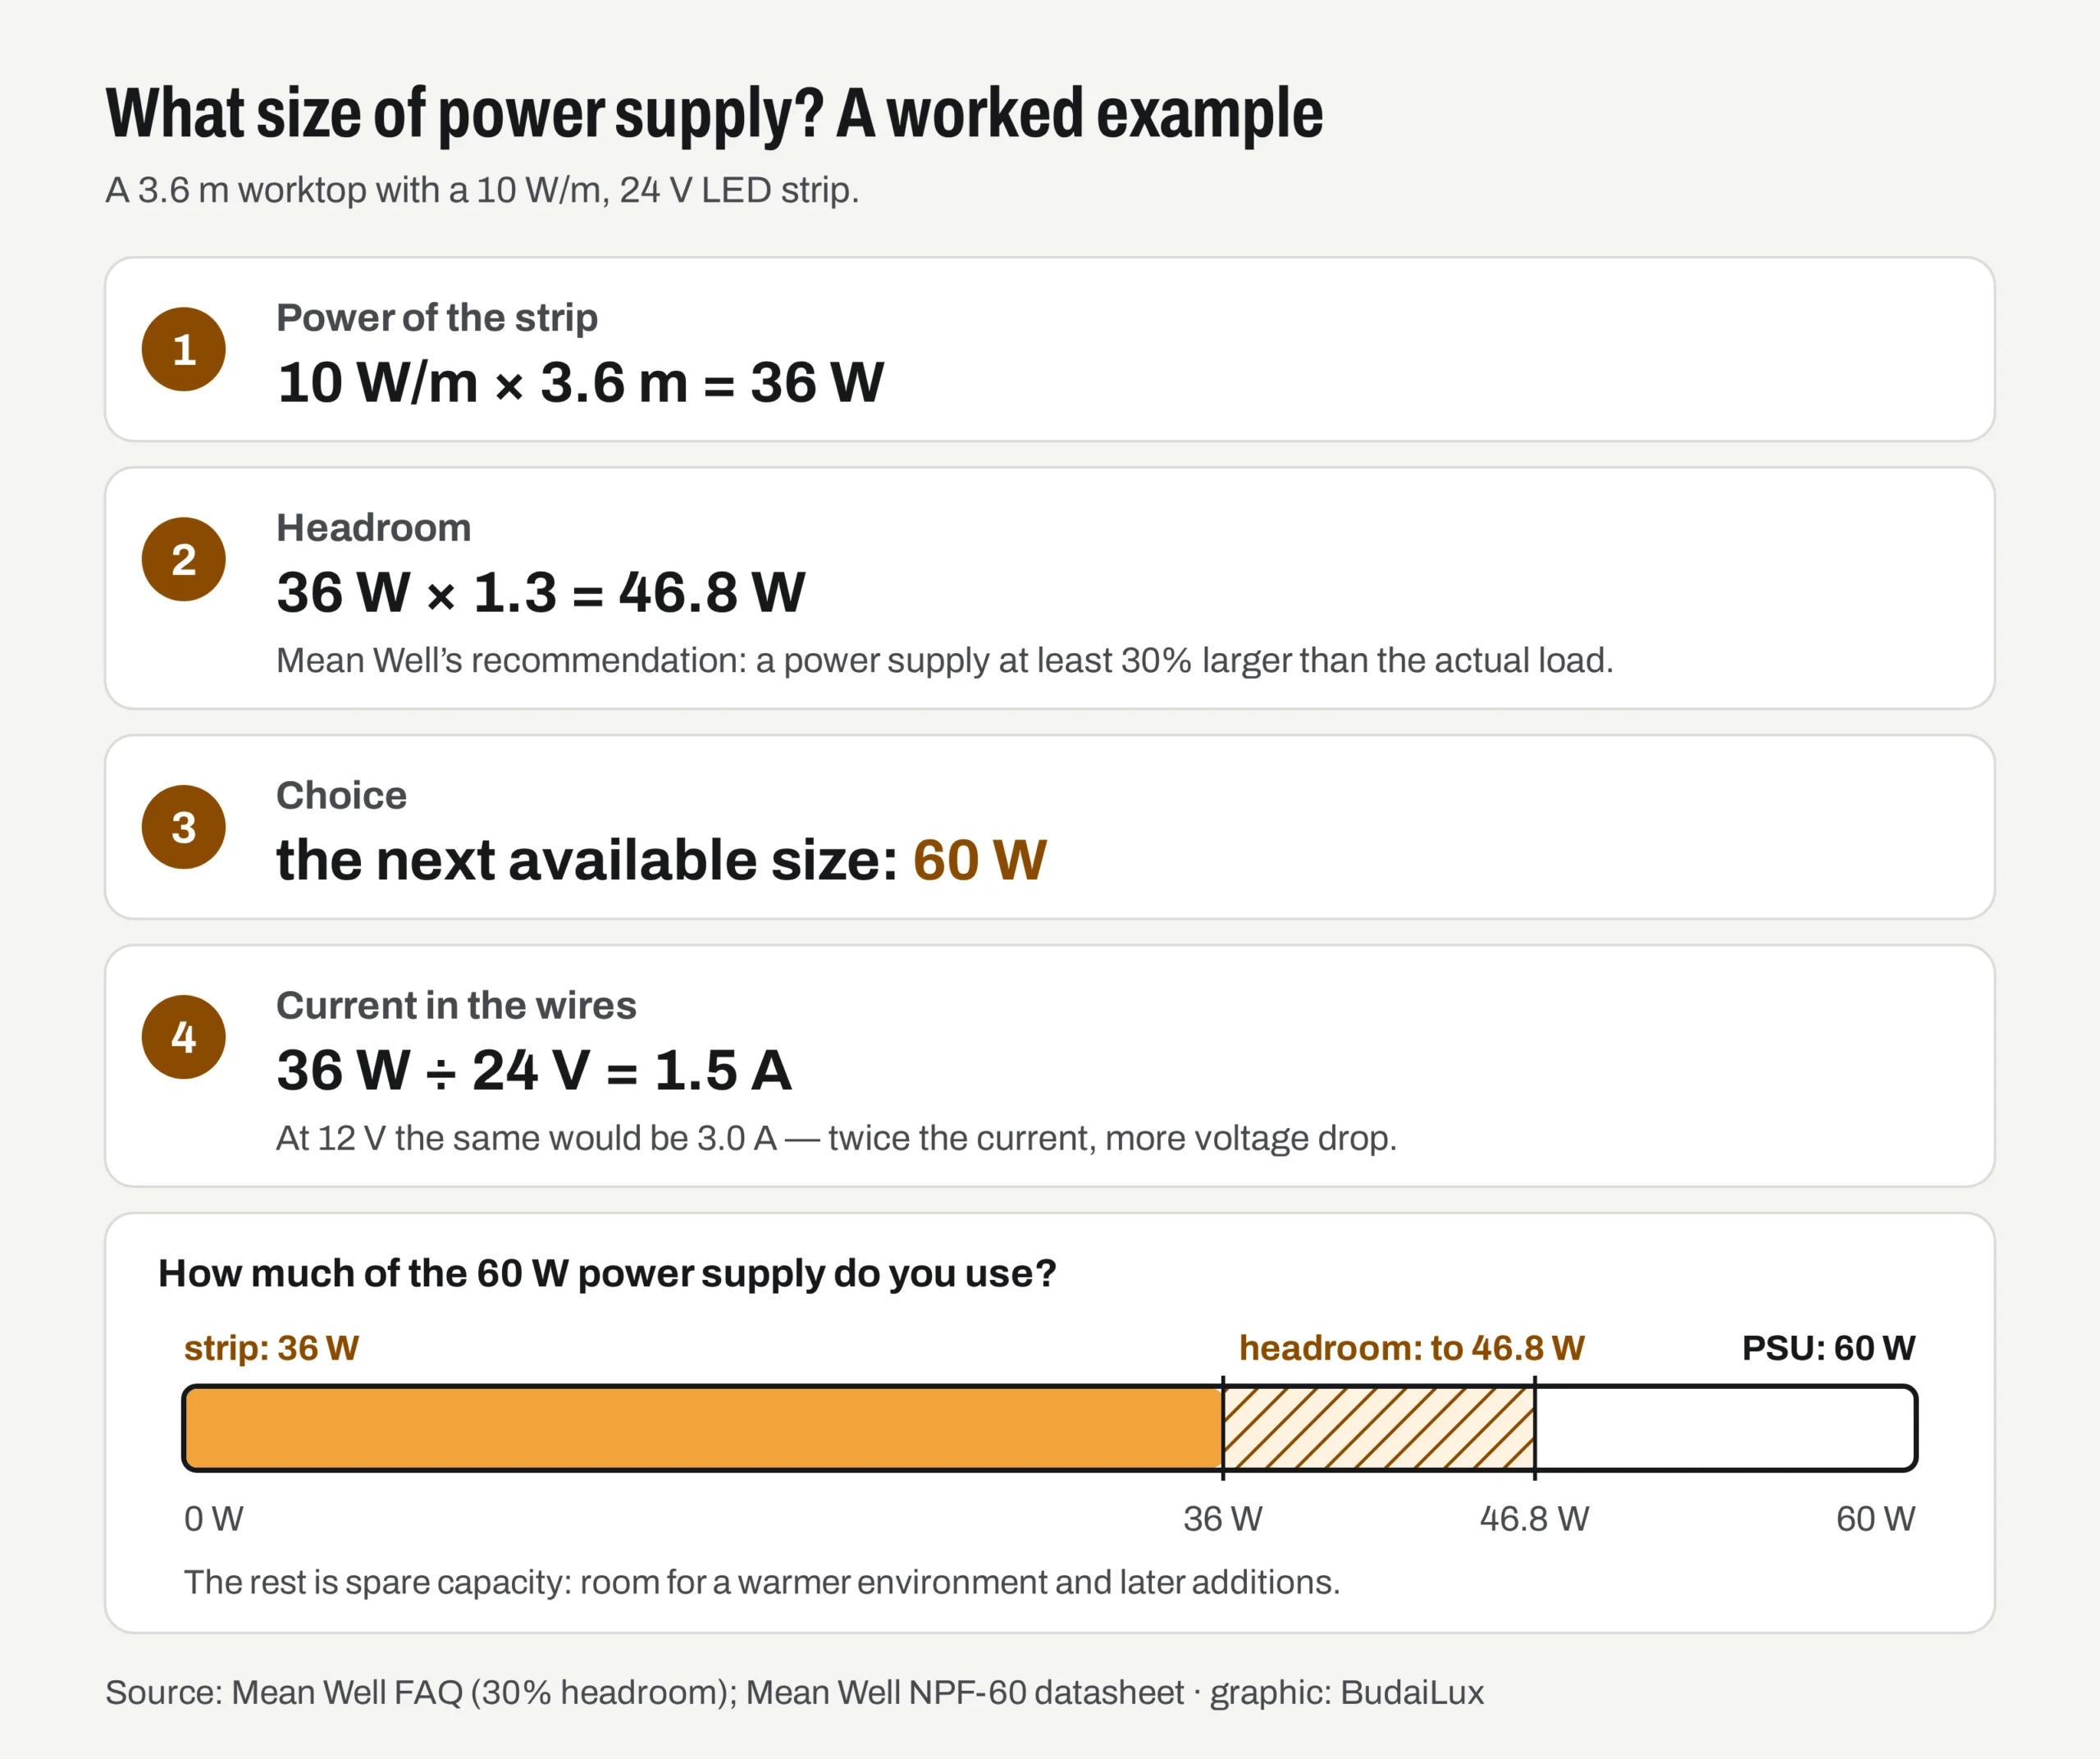
Why the headroom? A power supply only delivers its rated power under specified conditions. According to Mean Well’s installation guide, the load has to be reduced at high ambient temperatures or in non-standard mounting positions, and the output current and power must not exceed the rated values. On top of a cabinet or in a closed drawer, it is warmer than in a test laboratory.
An LED strip needs a constant voltage (CV) power supply with the same output as the strip: a 24 V one for a 24 V strip. Choose one that its manufacturer intends for LED lighting. Mean Well, for example, states on the datasheet for its popular LPV-60 series that in the EU it is not intended for LED luminaires, and recommends other series for that.
The power supply should stay accessible, so that it can be replaced, and it needs ventilation: according to Mean Well, don’t put anything on top of it, and leave 10–15 cm from any heat source. In a kitchen, that means not next to the oven or the hob, and not above the steam from the dishwasher.
Why do you need an aluminium profile and an opal diffuser?
An LED strip gets warm, and heat shortens its life. Datasheets give the highest temperature permitted at the strip’s measuring point (Tc point): for the LEDVANCE strips above, 75 and 85 °C respectively. An aluminium profile conducts the heat away; ENTTEC’s installation guide specifically recommends an aluminium profile, and notes that the more LEDs per metre, the more heat.
The profile’s other job concerns the light. Without a diffuser, every LED on the strip shows as a separate dot of light, and is reflected in a glossy worktop. An opal (frosted, milky) diffuser blends the dots into an even line of light. LEDVANCE’s rule: for even light, the spacing between the LEDs should be smaller than the distance between the LEDs and the diffuser. The LED spacing (pitch) is given in the datasheet: for a 60 LEDs/m strip, for example, it is 16.67 mm, so the diffuser should be at least that far from the LEDs.
The profile also protects the strip from grease and dust, and the diffuser can be cleaned with a damp cloth. An angled or corner profile directs the light more towards the worktop.
What IP rating do you need next to the sink?
Kitchens have no zones like bathrooms do: the zones of IEC 60364-7-701 (in Europe HD 60364-7-701, in the UK BS 7671 section 701) apply to rooms containing a bath or shower. Around the sink and the tap, however, the strip is exposed to splashing water and steam, so choose one rated at least IP44 there, that is, protected against water splashing from any direction — a silicone-coated version, for example. For sections that stay dry, an IP20 strip is enough.
Two details matter. The IP rating only applies to a strip installed as the manufacturer specifies, with its end cap and seal; a cut end that hasn’t been sealed is not protected. And the power supply should go in a dry, ventilated place, not under the sink. The two digits of the IP code are explained in our article on IP ratings, and bathroom zones in our article on mirror lighting.
Safety note. The strip and the 24 V side are extra-low voltage. LED strips are typically protection class III (as LEDVANCE’s datasheets also state), which means they must be supplied from safety extra-low voltage (SELV) — shown by the SELV marking on the power supply’s datasheet or label. Connecting the power supply to 230 V, however, or adding a new socket, switch or junction box, is a job for a qualified electrician. Before any 230 V work, the circuit breaker must be switched off and a two-pole voltage tester used to confirm that the circuit is dead; a screwdriver-type voltage tester is not reliable for this. Wire colours are covered in our article on live, neutral and earth.
How to switch it: motion sensor, touch switch or dimmer?
There are four common options:
- A wall switch on the 230 V side of the power supply. The simplest, but the wiring is a job for a qualified electrician.
- An extra-low-voltage switch built into the profile: a sensor that responds to a touch or a wave of the hand (infrared), between the power supply and the strip. Check its rated current: a 36 W, 24 V strip draws 1.5 A, so the switch must be able to handle more than that.
- Motion sensor: switches on when you walk in, and off after the set time. Wiring and setting up sensors (LUX, TIME, SENS) are covered in our article on motion sensors.
- Dimmer: an LED strip dimmer connected on the extra-low-voltage side, between the power supply and the strip, or a dimmable power supply (phase-cut, 0/1–10 V or DALI-controlled). Which dimmer works with which power supply is decided by the manufacturer’s datasheet; the details are covered in our article on dimmable LEDs.
Whichever you choose, the switch or dimmer must match the strip’s voltage and current, and the power supply’s manufacturer must allow that method of dimming.
Frequently asked questions
How many metres of LED strip can be connected to one power supply?
There are two limits. Power: the strip’s total wattage, plus headroom, must fit within the power supply (W/m × metres × 1.3). Length: only as much strip can be run from one feed point as the datasheet allows; a longer section has to be fed from both ends or at several points.
Can I stick the strip directly to the underside of the cabinet?
You can: the strips are self-adhesive, for a smooth, clean surface. For heat dissipation and even light, however, an aluminium profile with a diffuser is better, especially with higher-power strips and near the hob.
What colour of light is best for a kitchen worktop?
3000–4000 K. If the kitchen shares a space with the living room or dining room, stay at 3000 K so that the light in the two areas doesn’t clash. For colour rendering, Ra 90 or more is recommended, so that meat, vegetables and spices look natural.
Why is the end of the LED strip dimmer?
Because voltage drops along the strip’s copper conductors, and the further the LEDs are from the feed point, the less they receive. It means the section is longer than the datasheet allows: feed it from both ends, split it into several sections, or choose a 24 V strip.
Sources
- Mean Well: Frequently asked questions (FAQ) — a power supply at least 30% larger than the actual requirement; derating by temperature.
- Mean Well: Installation guide for LED power supplies (PDF) — ventilation, 10–15 cm from heat sources, the rated values must not be exceeded.
- Mean Well: NPF-60 series datasheet (PDF) — 5 A at 12 V, 2.5 A at 24 V, SELV, protection class II, IP67.
- LEDVANCE: LED Strip System (2019, PDF) — profiles and diffusers, the rule for even light.
- LEDVANCE: LED STRIP VALUE-600 datasheet and LED STRIP SUPERIOR-2000 TW datasheet — W/m, lm/m, LEDs/m, Ra, SDCM, Tc point, protection class III.
- ENTTEC: 73310 LED strip installation guide (PDF, 2026) — 10 m from one feed point, 13 m from two; an aluminium profile because of the heat.